We’re excited to hear your project.
Let’s collaborate!

Web design trends may come and go, yet a visually-appealing image gallery never gets outdated! So, learning how to create a Colorbox Drupal image gallery in Drupal 8 is crucial if you aim to “dazzle away” your visitors!
And before we delve deep into our step-by-step guide on putting together your gallery, we feel like stressing this out: Colorbox for Drupal 8 is an image field formatter in entities and views! Nothing less, nothing more!
But one that:
Now let's get straight to the core of our tutorial, which will take you from installing to key setups, to customization and all the way to theming your Drupal image gallery with CSS:
Installing Colorbox will be a two-step stage, in fact:
And it seems that “2” is your “lucky number” in this process, for there are 2 possible ways of installing the Colorbox module on your Drupal 8 site:
The choice is yours, the result is the same!
And you're almost done! “Almost”, for you still need to install your library in the “sites/all/libraries” folder on your Drupal site. Just access the same link on Drupal.org, go to “Dependencies” and click on the first link that you have there: “The Colorbox plugin 1.x“
Luckily, Drush saves the day, once again (and your time, as well) providing you with a simple command to install your library: drush colorbox-plugin. Easy peasy!
Note: since we're at the installing phase, we seize the chance to suggest you go ahead and install a Bootstrap-based theme, as well!
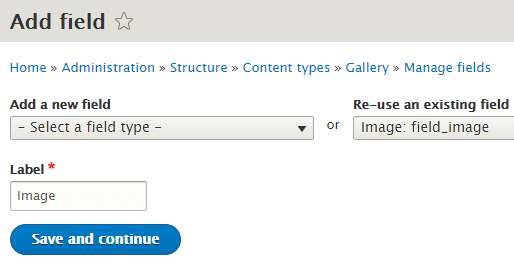
Now that everything's successfully installed on your computer and ready to be leveraged, let's create some content for our virtual gallery, shall we?
Here are the easy steps to take:

Now it's time to run a quick test on our gallery and you'll need content for this; “dummy” content accepted, too!
But first things first: name your new gallery! Then manually upload some of the images that you've already prepared for your gallery or use the Devel module for generating dummy content.
News alert: you get to leverage the MultiUpload option added to Drupal 8 and enter all your images at once (instead of one at a time, like we used to do it)!
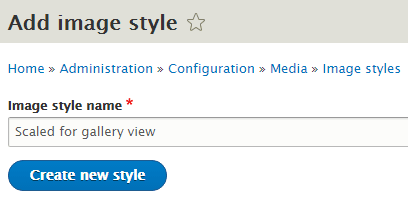
Now let's go to the next key step of this tutorial on how to create a Colorbox Drupal image gallery in Drupal 8: creating the image style!
Now have some fun configuring those images to your liking:

Great! Next, it's time you added a new effect to your newly created image style so that your images get sized the way you need them to.
For this:
You must be looking at the images in your gallery getting all piled up one under the other right now, with... no Colorbox effect whatsoever!
No need to despair! It's perfectly predictable and easy to “fix”: you just need to create a view: Structure > Views > Add new view!
Note: once you choose your new content type to keep in mind to select the “Gallery” type and to have your block displayed as a “View”, not as a “Page”!

Next “Add the Field” for your image. Then:
And it's time you placed your newly formatted block (or “block displayed as a view”, if you prefer), a step you can't overlook when you create a Colorbox Drupal image gallery:
Note: your view might not look exactly visually-enchanting right now. Yet, no need to worry, for we'll be applying CSS to it later in this tutorial. Also, at this stage of the process, you can't preview it in Views; you can only visualize it once it's live, on your website.
Since your view is not yet “ready to be shown off to the world”, you need to go back and edit it:
And it's about time that you “beautified” your new Colorbox gallery! Define the way your images and text will get displayed by theming it with CSS! For instance: you might fancy its title to be displayed over the images in your gallery, as a caption.
The location of your CSS file will depend greatly on the theme you'll choose to use!
The END! How about putting into practice all these info, tips and tricks here to create a Colorbox image gallery in Drupal 8? One to upgrade your current content and to impress your site's visitors with!

We’re excited to hear your project.
Let’s collaborate!