We’re excited to hear your project.
Let’s collaborate!

It's data that shapes today's digital landscape! This is no news for any player in the online arena! From big data to small data, from data-backed-up decisions to data-fueled digital strategies and data-driven web design, the online revolves around... DATA. And yet, not just around powerful “raw” data, but around perfectly structured, easy to parse through data. And in this respect, the Google Data Highlighter makes such an easy to use webmaster tool for setting up precisely these ideal data structures that Google can easily “crawl” through in order to better “assimilate” websites' particularities.
It's been designed with easiness of use, low budgets, and close to zero coding expertise in mind! So, it's meant to empower any webmaster/admin to get his/her Drupal site a big push up the search engine page results. It's meant to help site admins grow independent of the technical team, of time and budget constraints in their endeavor to put their Drupal sites into Google's spotlights!
Now, let's find out:
“Because Google doesn't have, not just yet, information of critical importance about your site and you should deliver it to the search engine."
Or better said: you should enhance its access to this information!
And this is some of the crucial data that you should make as easy to access and “interpret” as possible:
And it's by tagging the main fields on your site, so via so-called “microdata”, that you can easily deliver this key information about your site and in an easy to “digest” format, too.
We're talking here about articles, event names, software applications, products and so many other types of information that you can turn into microdata and “serve on a silver plate” to Google itself!
So that Google gets to know your site and gains an in-depth understating of its content, goals, and target audience. Of all its other key particularities. And the better it gets to know your website, the higher are its chances to increase its rankings in SERPs.
In other words: don't wait for your website to “be discovered”, but strive to enhance and to speed up its discovery! This is precisely what this tool here, supporting a whole variety of structured data, does!
Now let's point out and pin up all the key advantages for leveraging this tool; advantages that we've just more or less vaguely mentioned already:
Now that we've tackled the “whys” and the “which”, let's tackle the “how”, as well! Let us try a step-by-step guide on how to use this tool for marking up structured data on your Drupal site:
1. First things first: you log into your webmaster account (the one where your site is added as a property, of course)
2. Next click on the property whose pages you want to “Google highlight”
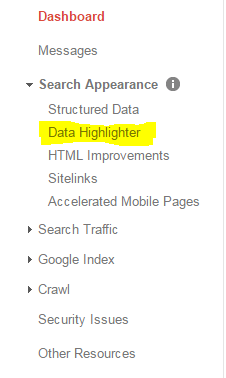
3. Access Search Appearance –> Data Highlighter (from the drop-down menu)
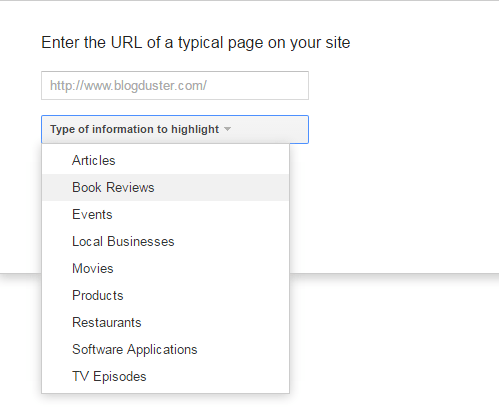
4. Next click on “Start Highlighting”; it will open up a dialogue including queries regarding the type of information displayed on that specific web page, an option for auto-selecting other similar pages, too (so that you don't have to go through this process over and over again for pages with similar formats), queries about the web page value, too
5. Then enter all the relevant info
6. Once you've entered the URL of your target web page and selected its type, as well, feel free to click on “Tag this page and other like this”; this way you'll be tagging pages with similar layouts and streamlining this process at the website's level
7. Once you've clicked on the “OK” button, a horizontal bar, divided into 4 tabs/sections, will pop up. These are (as you shall see):
8. The “Tag First Page” is the preliminary (and the key one) stage where you actually select pieces of content on your target web page and with a simple right-click on your mouse (which will unfold a drop-down menu) you get to select the category corresponding to each piece of content (Article, Image, Category, Author, Data Published).
Keep doing this till you've tagged each micro-data on your web page!
9. Once you click the “Done” button you'll get to the next stage listed in your horizontal top bar: “Create Page Set”. It's now that you get to select those pages having similar layouts for streamlining the whole tagging process. As you will see, you're also provided with an option that automatically selects all the similar pages for you.
Feel free to use it or to ignore it and choose to create your own custom page set instead.
10. Once you've clicked on the “Create Page Set”, you'll automatically get to the next step: “Tag More Examples”. It's on this page that you get to review your tagged web pages and make any needed fixes.
11. Click “Next” and check the web page tagging one by one, next click on “Review and Publish” the pages.
And this is how you highlight and tag your Drupal site's web pages using the Google Data Highlighter tool!
Yes, there are a couple of disadvantages, as well! And it's only fair that you take them into account so that you can ponder both the pros and the cons of using this tool for structuring the data on your website's pages:
Patience is a virtue, so they say!
As a closing piece of advice: a team of developers is always the best solution when it comes to optimizing your Drupal site. Yet, for those instances when you need to rely on a limited budget and on even lower resources of time, there's Google Data Highlighter!

We’re excited to hear your project.
Let’s collaborate!